This step-by-step guide on “How to Decorate Artisan Cookies Professionally” is designed to enhance the skills of both novice and seasoned bakers, transforming ordinary cookies into extraordinary works of art. By focusing on key techniques and artistic methods, the guide covers essential topics such as selecting the right equipment, mastering royal icing consistency, and exploring creative design ideas. With clear instructions and helpful tips, readers will learn how to achieve beautiful finishes and intricate details, ensuring their cookies not only taste delicious but also impress visually.
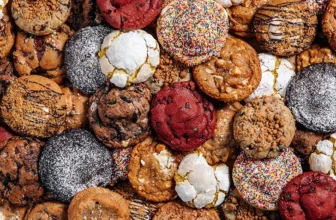
But first and foremost, what is an “Artisan Cookie”. Artisan cookies are a delightful category of baked goods, crafted with a high level of skill, creativity, and passion. They are often made in small batches using premium, natural ingredients, without the use of preservatives or artificial additives. These cookies can vary widely in flavor, texture, and design, often reflecting the baker’s unique style and attention to detail. Whether it’s a classic chocolate chip with a gourmet twist or an imaginative fusion of unexpected ingredients, artisan cookies stand out for their quality and craftsmanship. They are perfect for those looking to indulge in something truly special and thoughtfully made. 🍪
Gather Your Supplies
Gather all necessary supplies to ensure a smooth decorating experience. Collect cookies, royal icing, and food coloring first; these are the foundation of your sweet masterpiece. Assemble piping bags and a variety of decorating tools, such as spatulas for spreading icing, brushes for adding intricate details, and stencils for those who fancy a more structured approach. Double-check your supply list to avoid any mid-project runs to the store—because who wants to leave a cookie unattended?
Bake and Cool the Cookies
Bake your chosen cookie recipe until the edges are golden and the centers are just set, usually around 10-12 minutes at 350°F (175°C). Remove the cookies from the oven and resist the temptation to dive in right away; let them sit on the baking sheet for a couple of minutes before transferring them to a wire rack. Cool the cookies completely on the wire rack, which allows airflow on all sides and ensures that the icing stays intact — nobody wants a cookie puddle! For instance, if you’ve made royal icing sugar cookies, waiting patiently for that cooling process to finish will give you the beautiful, glossy finish you’re aiming for, rather than a messy icing disaster.
Prepare the Royal Icing
Mix royal icing until it reaches the desired consistency. Ensure it’s stiff enough for outlining, yet pliable for flooding applications. Divide the icing into separate bowls for easier coloring. Add food coloring as desired, stirring gently to achieve a uniform hue. Feel free to create a rainbow of colors or stick to a classic palette — the choice is theirs!
Outline the Cookies
- Grab a piping bag and fit it with a small round tip. Make sure it’s secure; we want no icing catastrophes here!
- Fill the bag with royal icing and get ready to show those cookie edges who’s boss.
- Carefully pipe along the edges of each cookie, creating a neat outline. Think of it as giving the cookies a chic new border—fashionable cookies are in!
- Allow the outlines to dry for 15-30 minutes. Now, this is the perfect time to show off your best cookie dance moves—just don’t touch the icing!
Flood the Cookies
Prepare your thinned royal icing by whisking in a bit of water until it reaches a smooth, pourable consistency. Use a spatula or piping bag to generously flood the cookies, ensuring every nook and cranny is covered. Grab a toothpick and gently spread the icing to create an even layer, taking care to reach the edges. Pop any pesky air bubbles by tapping the cookie lightly or using the toothpick to poke them, preventing those unsightly pockets from ruining your sweet masterpiece.
Add Decorative Elements
While the flood icing is still wet, sprinkle your chosen toppings right onto the surface of the cookie. Think of colorful sprinkles, edible glitter, or even additional colored icing designs. Gently press them into the icing to ensure they stick, but be careful not to smudge the flood icing beneath. Be as creative as you want—mix and match different elements for a dazzling display that will make anyone’s mouth water!
Let the Cookies Dry
Allow the decorated cookies to dry completely for the best results. Place them on a wire rack or flat surface, ensuring they aren’t stacked or touching to avoid any unnecessary icing intimacy. Cover them with a clean kitchen towel or parchment paper to protect them from any curious critters or dust bunnies wandering through the kitchen. Let them dry overnight; this little patience game ensures the icing sets firmly, making smudges as rare as a unicorn sighting!
Package or Display the Cookies
Package the cookies in cellophane bags or decorative boxes to keep them fresh and visually appealing. Tie up the bags with vibrant ribbons or add charming labels to give them a professional flair that would make any cookie connoisseur proud. Display them on a platter with a touch of creativity—think fun arrangements or even a whimsical theme that matches the cookie flavor. Let the cookies shine, as they not only taste delicious but also deserve to look fabulous!
Store the Cookies
Place decorated cookies in a single layer in an airtight container. Ensure the container is sealed tightly to keep out air and moisture. Store the container at room temperature, away from direct sunlight or heat sources. Check the cookies occasionally to confirm they are still fresh and delicious for that sweet indulgence!
Showcase Your Work
Capture high-quality photos of your decorated cookies by using natural lighting to enhance the colors and textures. Position the cookies on a clean, uncluttered surface, like a wooden table or a pastel-colored backdrop, to make them pop. Experiment with different angles; shoot from above to showcase a stunning cookie platter, or get close-ups to highlight intricate designs. Use props like a cute plate or some colorful sprinkles around the cookies for added visual interest and context.
Mastering the Art of Presentation
In conclusion, mastering the art of decorating artisan cookies is a delightful journey filled with creativity and practice. With the tips shared, he or she can transform ordinary cookies into show-stoppers that will surely impress friends, family, and potentially, even a future cookie empire! So, let the icing flow, the sprinkles fly, and remember—each cookie is a blank canvas just waiting for a touch of your unique flair. Happy decorating!
Essential Supplies Needed
Expert Techniques Unveiled
Unleashing the Magic of Artisan Cookies: Tips for Perfect Enjoyment and Presentation
- Savor the Experience: Before diving in, take a moment to appreciate the cookie’s aesthetic. Artisan cookies often look like tiny works of art, so it’s important to take at least one selfie with them. Bonus points if you use a fancy filter!
- Pair with the Perfect Beverage: These cookies are like social butterflies; they love company! Enjoy them with coffee, tea, or even a glass of milk (if they have a thing for nostalgia). Just remember, milk and cookies deserve a cozy couch setting
- Share with Friends (or Don’t): While sharing is caring, these cookies might have a magical power that makes people want to keep them all to themselves. If they do decide to share, maybe whip up a cookie tasting party! Just don’t blame them if everyone ends up trying to snatch their favorites
- Experiment with Pairings: Feeling adventurous? Try crumbling an artisan cookie over ice cream or yogurt to level up your dessert game. It’s like an instant upgrade from a humble scoop to a gourmet masterpiece!
- Store Them Properly: If they last long enough to need storing (which is a rare feat), keep them in an airtight container. The last thing they deserve is to go stale—unless they’ve decided to pursue a career as a doorstop!
- And there you have it! Artisan cookies: the delightful treats that bring joy, laughter, and maybe a few sneaky crumbs along the way!